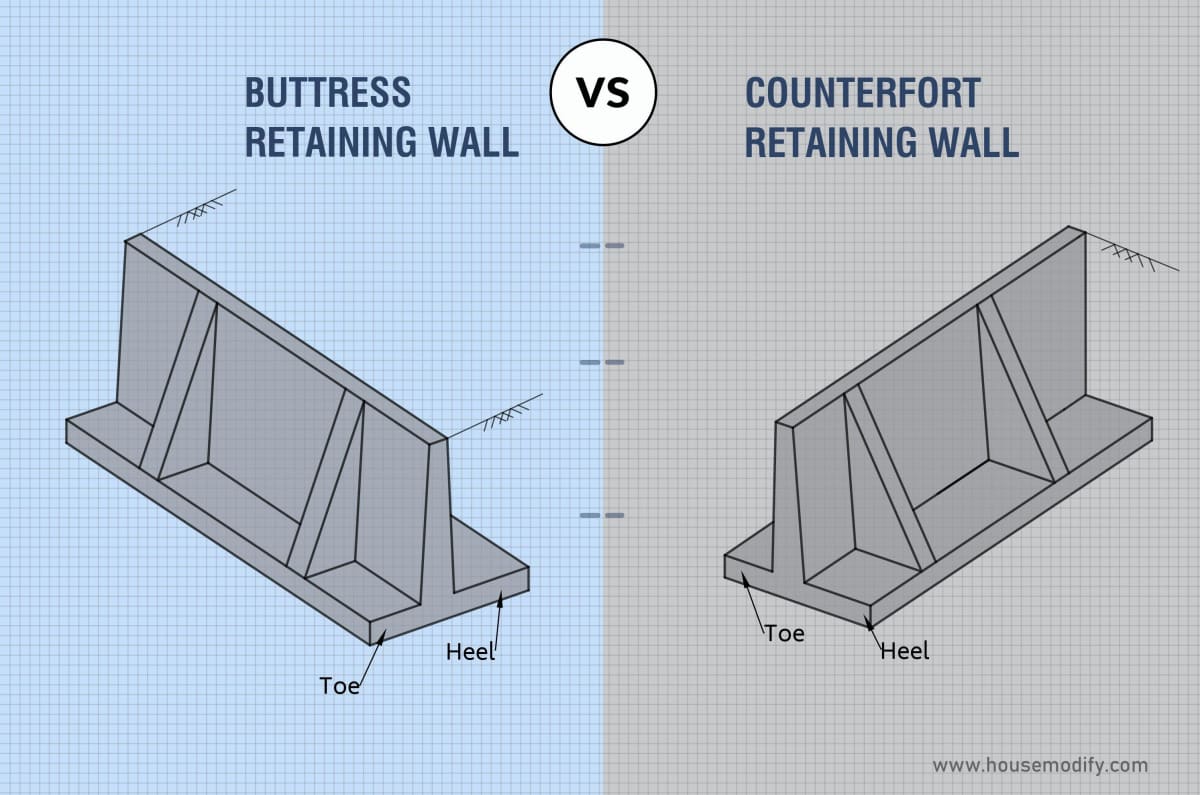
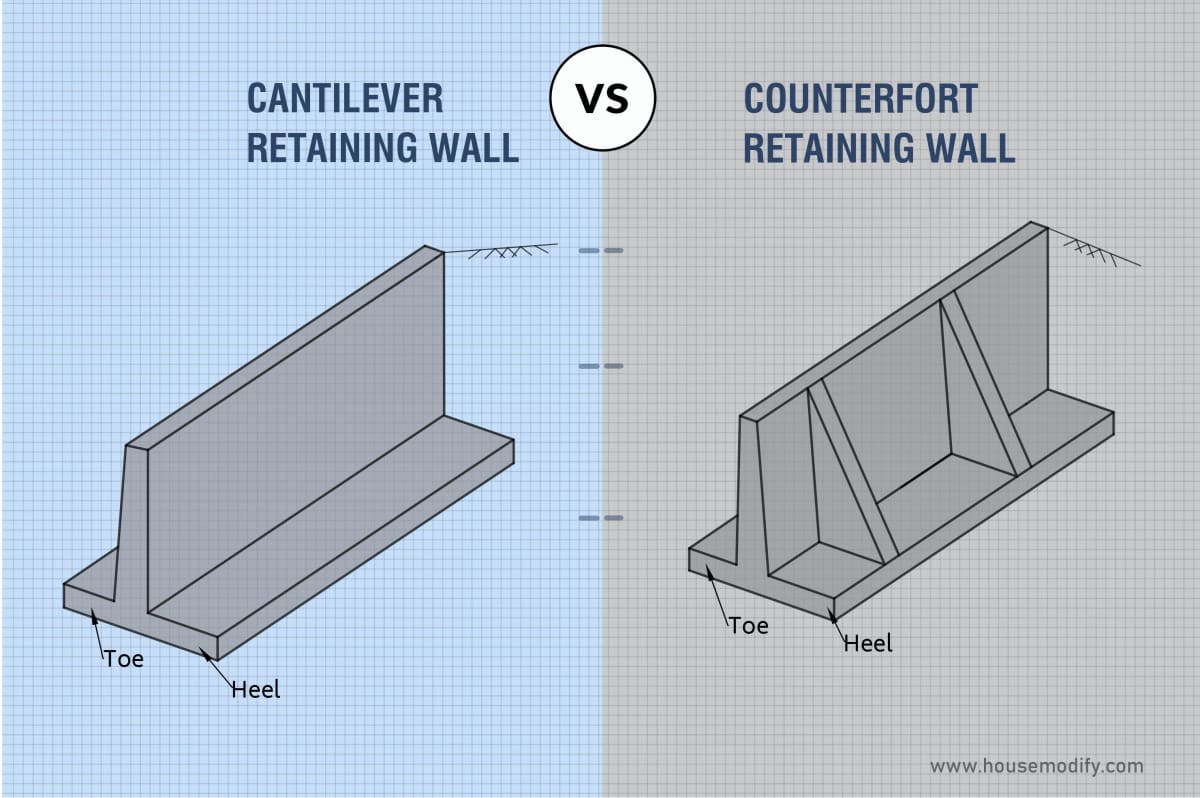
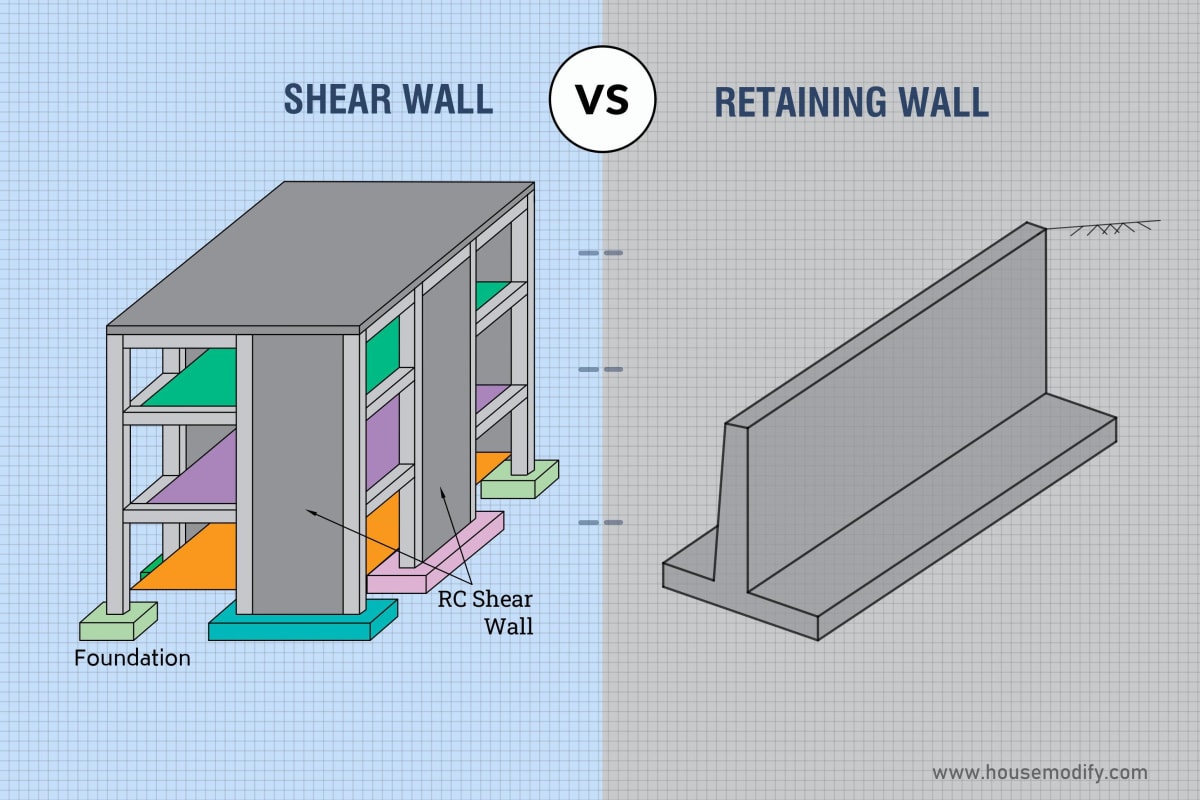
Have you ever wanted to build a fireplace?
Fireplaces not only enhance a home’s ambience but can also produce relevant, affordable heat.
You might instal a fireplace if it doesn’t currently exist in your house, but before making a decision, weigh your possibilities.
This fireplace has designed to work with electric inserts rather than wood or gas inserts.
There are several authentic electric fireplace inserts available right now.
They are considerably less expensive than gas, which allowed us to fit them inside our budget.
While detailing exactly how we built our fireplace, this is merely a step-by-step process to construct our fireplace.

Step by Step to Build a Fireplace:
1. Select the Fireplace:
A grounded 120V outlet should be above or close to the fireplace.
Avoid regions that receive direct sunshine since the fake flame will disappear in the harsh light.
Consider whether you want to place the fireplace under a TV if the fireplace insert contains a heater.
2. Take down the baseboard:
Remove the baseboard from the wall using a prybar.
3. Size the Fireplace Insert Mounting Frame:
Build a frame out of two-by-sixes to hold the fireplace insert inside the fireplace wall.
The interior measurements of the frame should be 1/8 inch larger on all sides than the approximate opening measurements of the fireplace insert.
Rough opening dimensions should be listed in the fireplace insert’s guidelines.
The mounting structure will be made up of three two-by-sixes: one at the top, one at the bottom, and two on the sides.
Each horizontal component should be 3-1/4 inches longer than the insert’s width overall.
The vertical two-by-sixes on the left and right (the light and dark) should be around the height mentioned plus 1/4 inch.
For instance, let’s say the directions call for something that is roughly 18 inches high by 36 inches wide.
2 boards should be cut to 18-1/4 inches each, and 2 boards should be 39-1/4 inches apiece.
4. Build the Fireplace Insert Mounting Frame:
With the help of the drill and 3-inch screws, construct the mounting frame for the fireplace insert.
To maintain the frame square, join the boards precisely.
You may gauge the size by placing the fireplace insert inside the frame.
5. Determine the height of the fireplace wall:
Height is an issue because the fireplace wall will be constructed on the ground before being tilted upward.
Tilt-up walls can’t reach the room’s ceiling.
Lower the height by 2 inches to take into account the height of the wall while it is tilted up.
For instance, the ceiling measures 90 inches high.
Subtract 3 inches for the horizontal two-by-sixes at the top and bottom.
To enable the wall to be tilted upward, take away an additional 2 inches.
As a result, the vertical two-by-six should be trimmed to 85 inches.
6. Build the Fireplace Wall:
Build the fireplace wall using seven vertical two-by-sizes spaced evenly between two horizontal two-by-sixes measuring 8 feet in length.
The studs should be spaced evenly, every 16 inches.
Use two screws for each attachment point.
7. Fix the Mounting Frame to the Wall of the Fireplace:
In the centre of the fireplace wall, place the mounting frame.
Select a height that is aesthetically pleasing and convenient to the outlet so the fireplace insert may be plugged in.
Mark the studs that must be cut in the vertical direction, and dispense with the mounting frame.
With the Speed Square, keep marking downward.
Using a hand saw, cut along the lines.
Set the mounting frame in place.
Screws that pass through the mounting frame’s interior are used to fasten it to the studs.
8. Block the Studs:
Cut two by sixes into four pieces that are 14-1/2 inches long.
Put these four pieces flat and flush with the rear of the wall between the studs to assist attach the fireplace wall build to the house wall.
Place two blocks below and two blocks above the fireplace and insert the mounting frame.
Through the studs, fasten the blocks into position.
9. Connect the Fireplace Wall to the Room Wall:
Adjust the fireplace wall’s slant with a helper so that it is vertical.
Place it up against the wall by moving it.
Ensure that the outlet will not be hidden by any studs and will be located between two studs.
Locate the house’s wall studs behind the stud blocks that were previously put using a stud finder.
The fireplace wall should be fastened with 3-inch screws.
10. Fill in the Fireplace Wall with Cement Boards:
Attach the cement board to the hollow wall studs using screws.
Make sure to sink the screwhead.
Every vertical edge must rest on a stud.
Apply cement board tape to all seams.
Prepare a little quantity of mortar.
Apply mortar over the tape using the trowel.
11. Insert the fireplace in the fireplace wall:
Connect the fireplace insert’s plug.
Enter the mounting frame by sliding it in.
Before applying the veneer to the frame, place a sample piece on the cement board close to the fireplace insert.
The fireplace insert’s stone veneer edge should match, plus an extra 1/4 inch to account for mortar.
12. Install the fireplace insert as directed by the manufacturer:
Brick or stone should be fastened to build the fireplace wall.
To secure the fireplace insert’s border and keep it safe, cut a 1-inch strip of cardboard.
On the floor close to the fireplace wall, draw the stone veneer in a dry layout.
The stone veneer should be cut as much in advance as feasible.
Use a wet tile saw to cut the veneer.
In the 5-gallon bucket, combine the stone veneer mortar and water.
Before mounting each stone on the wall, apply butter to the back of each one and mortar to the cement board.
Keep a 1/8-inch space between the walls and the floor.
To cover the edge, the top row of veneer stones should extend 1/4 to 1/2 inch above the top of the fireplace wall.
After finishing, take off the fireplace’s safety strip.
13. Consult a professional if required:
Some fireplace inserts might need to be hard-wired into the house’s electrical system rather than using a cord that plugs into an outlet.
If necessary, use a qualified, certified electrician to directly wire the fireplace into an electrical box by local codes.
Tips to Build a Fireplace:
This style of false wall paired with a fireplace insert is known as a “media wall.”
Above the fireplace, a TV screen is frequently installed.
All cables and wires are hidden by the artificial wall.
The 5-1/2-inch depth of the two-by-sixes is adequate for many electric fireplace inserts.
Make careful to check the size and venting requirements for your particular insert.
As long as the studs are 16 inches in the centre and a 1/2-inch cement board is used, the cement board can be put straight to the studs without sheathing or support.
It is frequently possible to buy matching outer-corner veneer stones individually.
These facilitate veneering more quickly and result in cleaner corners.
FAQ- How to Build a Fireplace:
Q1. What is the price of installing your fireplace?
The price of installing a fireplace varies greatly depending on the kind, size, and existence of venting choices.
Most people may anticipate paying between $870 and $3,792 for fireplace installation or an average of $2,314.
Q2. Can you build your fireplace?
There are many various ways to DIY a faux fireplace or faux mantel.
Perhaps the fireplace’s appearance provides your living room or bedroom with a focal point.
That is entirely possible with a fake fireplace mantel, even with the addition of a homemade electric fireplace.
Q3. Can a fireplace be constructed without a chimney?
Gas fireplaces include a subcategory called ventless gas fireplaces.
They are fuelled by liquefied petroleum gas or natural gas.
They are made to function without a vent or chimney.
By utilizing less gas, the design is accomplished while minimizing the number of emissions.
Conclusion:
An electric fireplace inserted into a faux fireplace wall is a safer, simpler, and more environmentally friendly choice to build a fireplace without the need for venting.
Since the fireplace can be covered in combustible materials or veneer brick or masonry to replicate the genuine thing, this style is growing in popularity.