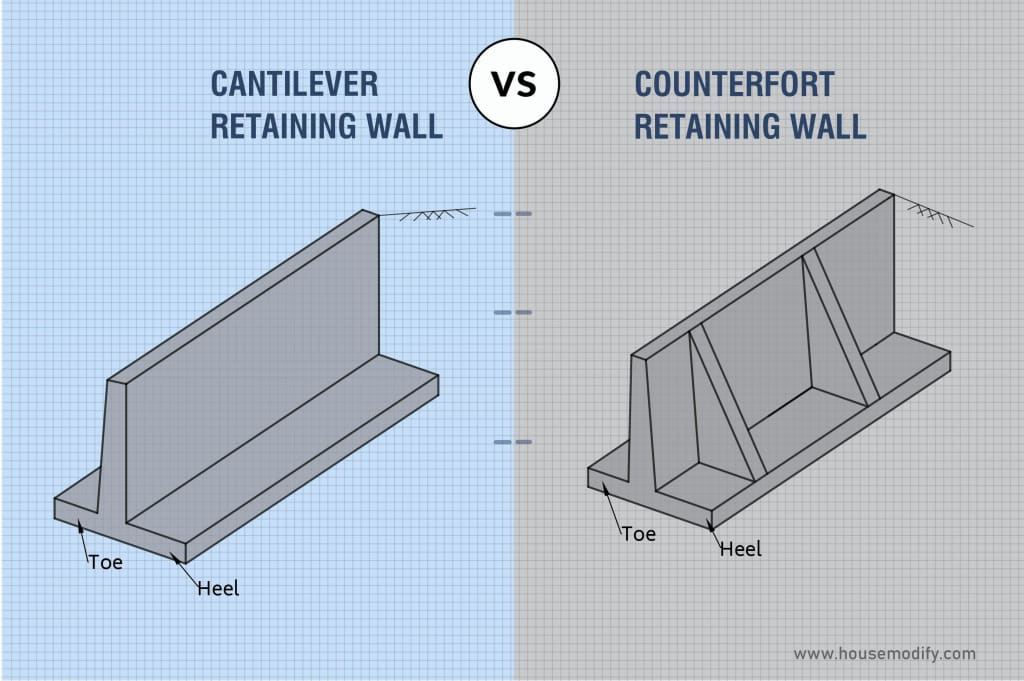
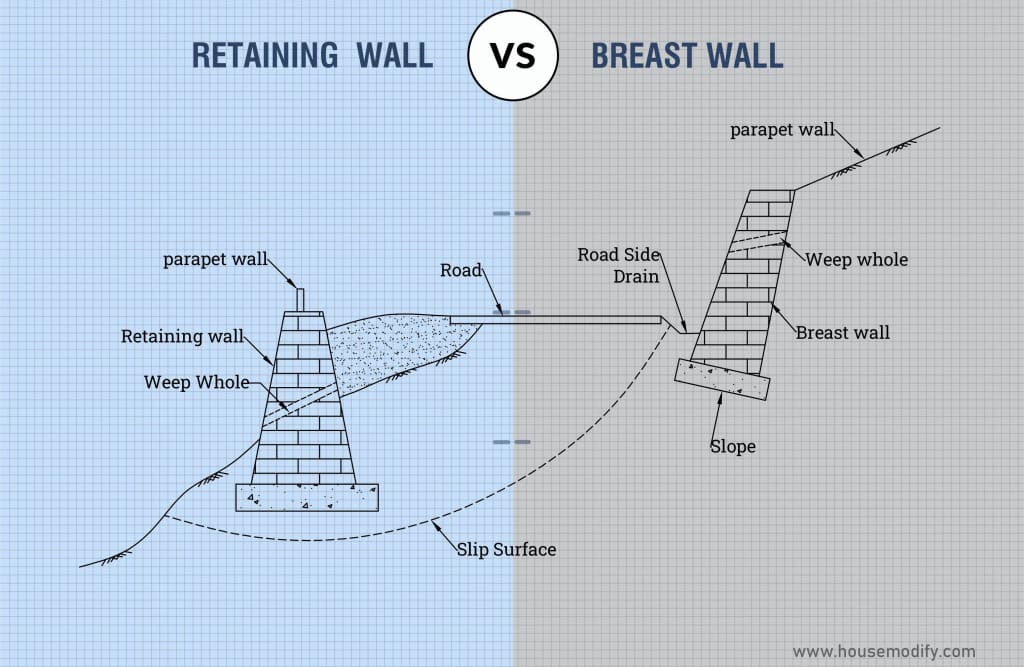
The changeover between the two levels of ground is build using the stone retaining wall.
By reducing the slope and enabling level ground above and below the wall, retaining walls increase the amount of flat, usable land in the yard.
DIYers can build walls no longer than 3 feet in most areas as anything tall should be handled by an expert.
The simplest approach to construct a stone retaining wall is using the dry-stack technique that doesn’t utilize mortar in between the stones and doesn’t need a concrete foundation like mortar walls to do.
Water can pass through dry walls because they have better drainage.
This helps reduce the hydrostatic pressure, the main reason for retaining walls is due to damp soil behind the wall.
Proper drainage will protect the wall’s durability as well as its structural integrity.
Backfilling the wall with rock prevents dirt from shoving through the rock fractures and promotes drainage through the wall.
11 Steps to Build a Stone Retaining Wall:
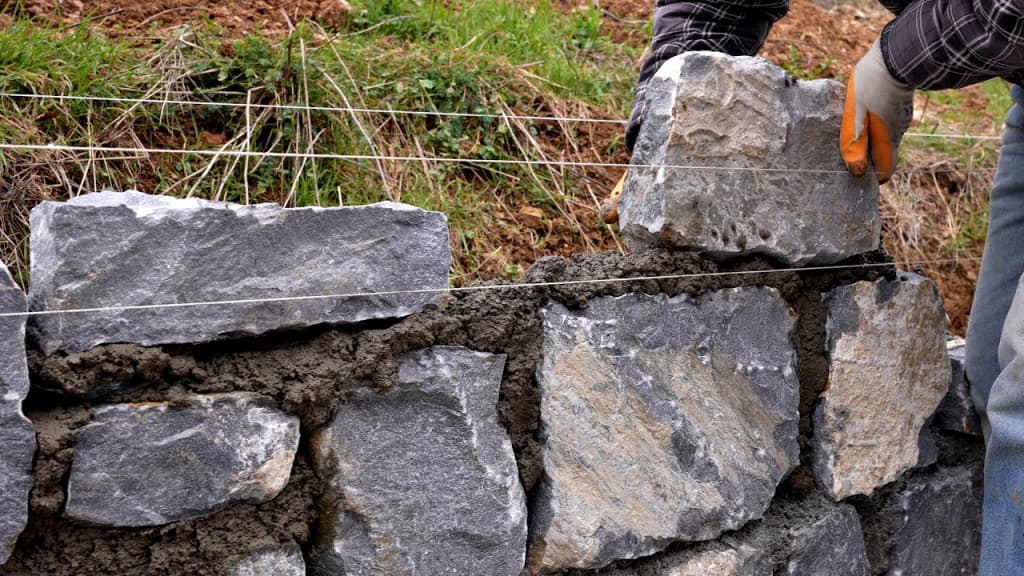
1. Collect the stones:

The size and shape of the wall stones should be used to sort them into various piles.
The largest, flattest stones should be used for the base of the wall and the widest, smoothest, and most attractive stones should be saved for the capstone at the top of the wall.
To maintain overall uniformity, remember that odd-shaped stones can be mixed with more common stones.
You can also use a brick chisel and mallet to carve out peaks and other shapes so that they fit properly during construction.
2. Make a level line:
To identify where the front of the wall’s foundation is placing wooden stakes and a mason’s line.
The string also designates the front of the trench which will serve as the wall’s base.
The trench’s front-to-back breadth should be at least half as tall as the total wall.
For instance, the trench must be at least 15 inches broad if the wall is 30 inches high.
Before tying the string to the pole, lay a line level on it, pull the string from one end and then level the line before the stone retaining wall is build.
3. Dig up the area:

Excavate the area, back to the slope from the string.
To make a flat, level trench for the gravel base and the first course of blocks, which will be under grade, dig 12 inches into the ground.
If required, dig into the slope to make a 6- to 12-inch wide gap for drainage rock between the back of the wall and the slope.
To ensure that the excavation is level, take measurements from the level line as you go.
4. Add landscape fabric:

The excavated area should be covered with strips of landscape fabric (not plastic), perpendicular to the face of the wall, and a few feet above the ground.
Separate neighbouring fabric strips by six inches.
The strips should be cut to the appropriate length using a utility knife.
5. Prepare the wall base:

Add 5 inches of gravel that has been crushed to the trench.
Rake the gravel to smooth and flatten it, then use a hand tamp or leased power tamper to compact it firmly.
Add a 1-inch layer of coarse sand over the gravel.
Using a small 2×4 board, level the sand.
6. Take the first course:

To build the first path of the stone retaining wall, place large, flat stones along the front border of the trench.
The tops of each stone should remain level with one another by adding or removing sand as needed.
As you work, place a 4-foot carpenter’s level on a few stones to make sure they are all level.
7. Have another course:

As in a 1-over-2 pattern of bricks, lay the next course on top of the first course of stones, offsetting (or “staggering”) the joints between the stones.
As a result, the wall becomes stronger.
Additionally, space the front of the stones 1/2 inch in front of the first course (downhill).
As a result, a slight stair-step is formed called a batter that helps the pressure-bearing capacity of the wall.
Do as little wiggle as possible as you do each set.
Small, flat rocks back as shims to prevent wobble.
8. Start filling in the blank space on the wall:

In the space between the wall and the slope, spread drainage gravel.
Before properly trod ding the gravel using a hand tamp, it should be levelled and scraped.
Only backfill the area up to the wall’s uppermost course.
9. Add additional courses:
Create the second and subsequent courses of stone using the same techniques, spacing the joints with the successive course and adding 1/2 inch of batter for each course.
Install “Deadman” stones which are long stones that extend back up the slope to help the earth build the stone retaining wall, beginning with the third course.
If necessary, dig into the slope and place a Deadman every four feet to level the stones from front to back.
Deadman stone can be used in one course for walls 30 inches or less, but two courses are recommended for taller walls.
Fill in the wall with gravel little by little.
10. Finish the top of the wall:

The landscaping fabric should be folded over the drainage gravel as you climb the wall.
You can do this either well before the final one or two regular courses or before the capstone (top course) based on the soil you want on the top of the wall (for grass growth).
To finish the top of the wall, place a final course of stone and/or capstone.
If desired, you can use stone adhesive to glue the course below to help hold the capstone in place.
11. Backfill with soil:
Cut the landscape cloth so that it barely touches the top of the wall.
If desired, add dirt behind the top of the wall and cover it with landscaping fabric.
For grass to grow in this region, the soil layer must be at least 6 inches thick.
Tips for Stone Retaining Walls:
- If your land has natural field stone that is flat enough to stack, you can use it to build a stone wall.
- If you must buy stone, pick a flat stone like flagstone or a cut stone like ashlar.
- Fieldstone is significantly harder to handle than flat or cut stone, which will strengthen the walls.
- To give the wall a more natural or worn appearance, consider adding plants in a variety of locations.
- Coarse stone naturally has open spaces that are large enough to accommodate planting and soil.
- If you are using cut stone, plan the planting area when building the wall, they do not need to be large and they should not affect the strength of the wall.
- Cascading plants including creeping thyme, perennial yellow alyssum, and annual white alyssum, look lovely along stone retaining walls.
- Herbs grow well next to or even on rock walls.
FAQ- How to Build a Stone Retaining Wall?
Q1. What kind of stone would work best for a retaining wall?
Concrete blocks poured concrete, and dry stacks of stone are the three greatest materials for retaining walls.
Each one gives the yards they are in a unique look and feel.
Other stone possibilities include gabion, dry boulders, wood, brick, and dry boulders.
The majority of retaining wall types can be enhanced with stone veneer.
Q2. Is a footing necessary for a stone wall?
Every stone wall that has been mortared requires a strong base.
You might be able to construct your stone wall on a ledge with some luck.
You will need to lay a concrete base if the area where your stone wall will be built lacks a ledge.
Q3. How much depth should a stone wall have?
Approximately 6 inches broader than your wall, dig a trench.
For a 3-foot-high wall, it must be at least 12 inches deep and deeper than the local frost line.
Conclusion:
Although they require a lot of labour, stone retaining wall build can be a great addition to your yard.
As a result, you can expand your yard on previously unused land, which is a desirable quality.
You can build a sturdy wall using these instructions, and it will last for many years.
Section Under: Retaining Walls